Hi Gliders,
I have created my own Glide App called TV Shows.
In this, I keep track of what episode I have watched from which TV Show. So I know what episode I need to watch next. Because I have so many shows, I have sorted them by which show I had watched last, at the bottom of the list.
Right now, I have placed a list of episode numbers in an options tab in my Google Sheets and I am using the Choice component to select what episode I am watching.
If I want to select episode number 20, I need to scroll through the whole list.
So I was thinking of making it easier and create my own button bar.
Because the standard button bar only has two options and I would like to have three options.
In my Google Sheets, I have created an extra tab called EpisodeCounter.
In there I have the columns Name, Index, ColorName, and ColorImage.
In ColorName I have placed the color I want each button to have and in ImageColor is the color. (Color from “Image from Color”.)
In Name I placed, Previous, Reset, Next, with the index numbers 1, 2, 3
I used an InLine List in Tiles and placed the three names in one line.
This is working.
Now comes the part where I need some help.
For the Action, I chose to create my own action.
If index is 1 then…
If index is 2 then…
If index is 3 then…
I thought of using set column values, but the only tab/sheet I can choose is “This item” but I want to change the values in a different table/sheet.
When the index is 1, then the episode number needs to go down one number.
When the index is 2, then the episode number needs to be set to 0
When the index is 3, then the episode number needs to go up 1 number.
But I only see the columns from this EpisodeCounter tab/sheet.
All the episode numbers are in a table/sheet that is called Shows. There are also the TV show’s names and more info.
I hope my question is clear and what I am trying to do.
Many thanks for all your tips and trick, and time.
Please try to be as detailed and simple as possible. I am still learning things from Glide Apps and I am not sure where I can find some things or how to do some things. ![]()
Thanks
If I can make an observation, I think your approach to this is a bit more complicated than it needs to be.
Are you open to an alternative (and simpler) approach?
Hi @Darren_Murphy ,
Of course.
Everything is welcome🙂
Okay.
Everything I talk about here should be done in Glide. You can close your Google Sheet and pretend it doesn’t exist ![]()
- So what I would do is add a User Specific Boolean column to your Episodes table.
- If that column is checked/true, it means that you have watched that episode. We’ll call this column “Watched”
- Add an if-then-else column to the same table. Configure it as follows:
– If Watched is checked, then “Mark Unwatched”
– Else “Mark Watched” - Now on your Episodes details screen, add a button. Use the if-then-else column as the label for that button
- The button should have a custom action, configured as follows:
– If Watched is checked
— Set Column Values → Watched → Clear Value
– Else
— Set Column Values → Watched → true - Finally, you can add a filter to your list of episodes. The filter should be “where watched is not checked”
With all the above in place, all you need to do is tap the button as you finish watching each episode, and it will be removed from the list, leaving only the “Unwatched” episodes.
Now, one problem with the above will be that your watched episodes will have disappeared, and you might want to go back and review them, or maybe mark them as unwatched. There are lots of ways you could deal with that.
- You could duplicate the list component and reverse the filter (“where watched is checked”). This would give you two separate lists - one for watched and one for unwatched.
- Or, you could remove the filter from the list and instead group the list by the Watched column.
- Or, you could use a user specific toggle to switch between the two lists. (I won’t go into details of this one, but if you want to use it let me know and I’ll explain)
Wow, thanks for all of this.
But now I am trying to see how I could implement it or how I could change everything.
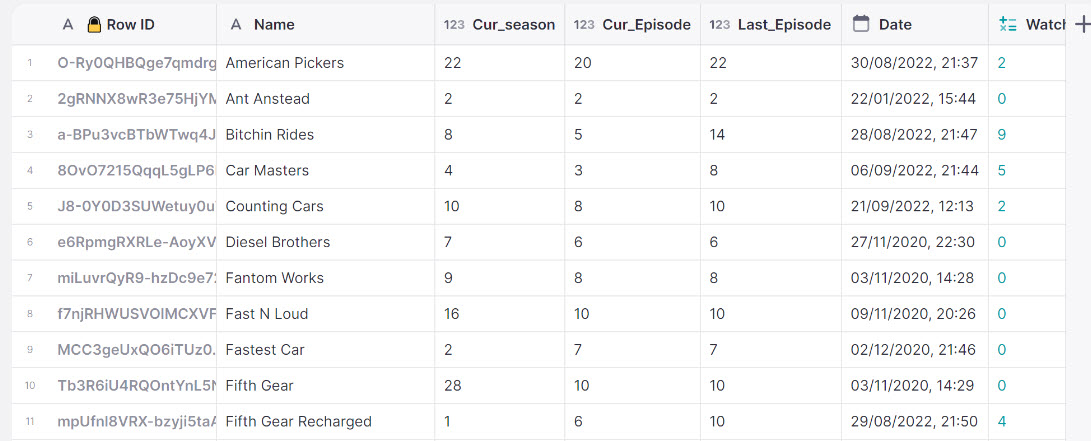
In the Google Sheets, I have the following layout;

So I have the Show/Series name, What Season, Current Episode, and what will be the last episode. At the end, I use an image from a website.
I think the way you had set it up, is that I use the episode name and then mark it as watched or not.
Maybe this will change the way you had it in mind?
I could use your suggestion, but then somehow I need to include the show/series name.
In my current way, I sort it to the last edited date. This way I am not watching every show/series at one time, but give every show/series an equal chance to be watched ![]()
I would like to see your thoughts on it, and I am open to any ideas/suggestions.
This was the first Glide app I made, so that’s why it maybe looked very simple ![]()
ah, I see. I misunderstood how your data is laid out. I was working on the assumption that you had a list of episodes for each series.
Can you show me a couple of screen shots of how this looks inside your App? (the screens, not the data editor). It’s late here now, but if you can share some screen shots I’ll take another look tomorrow.
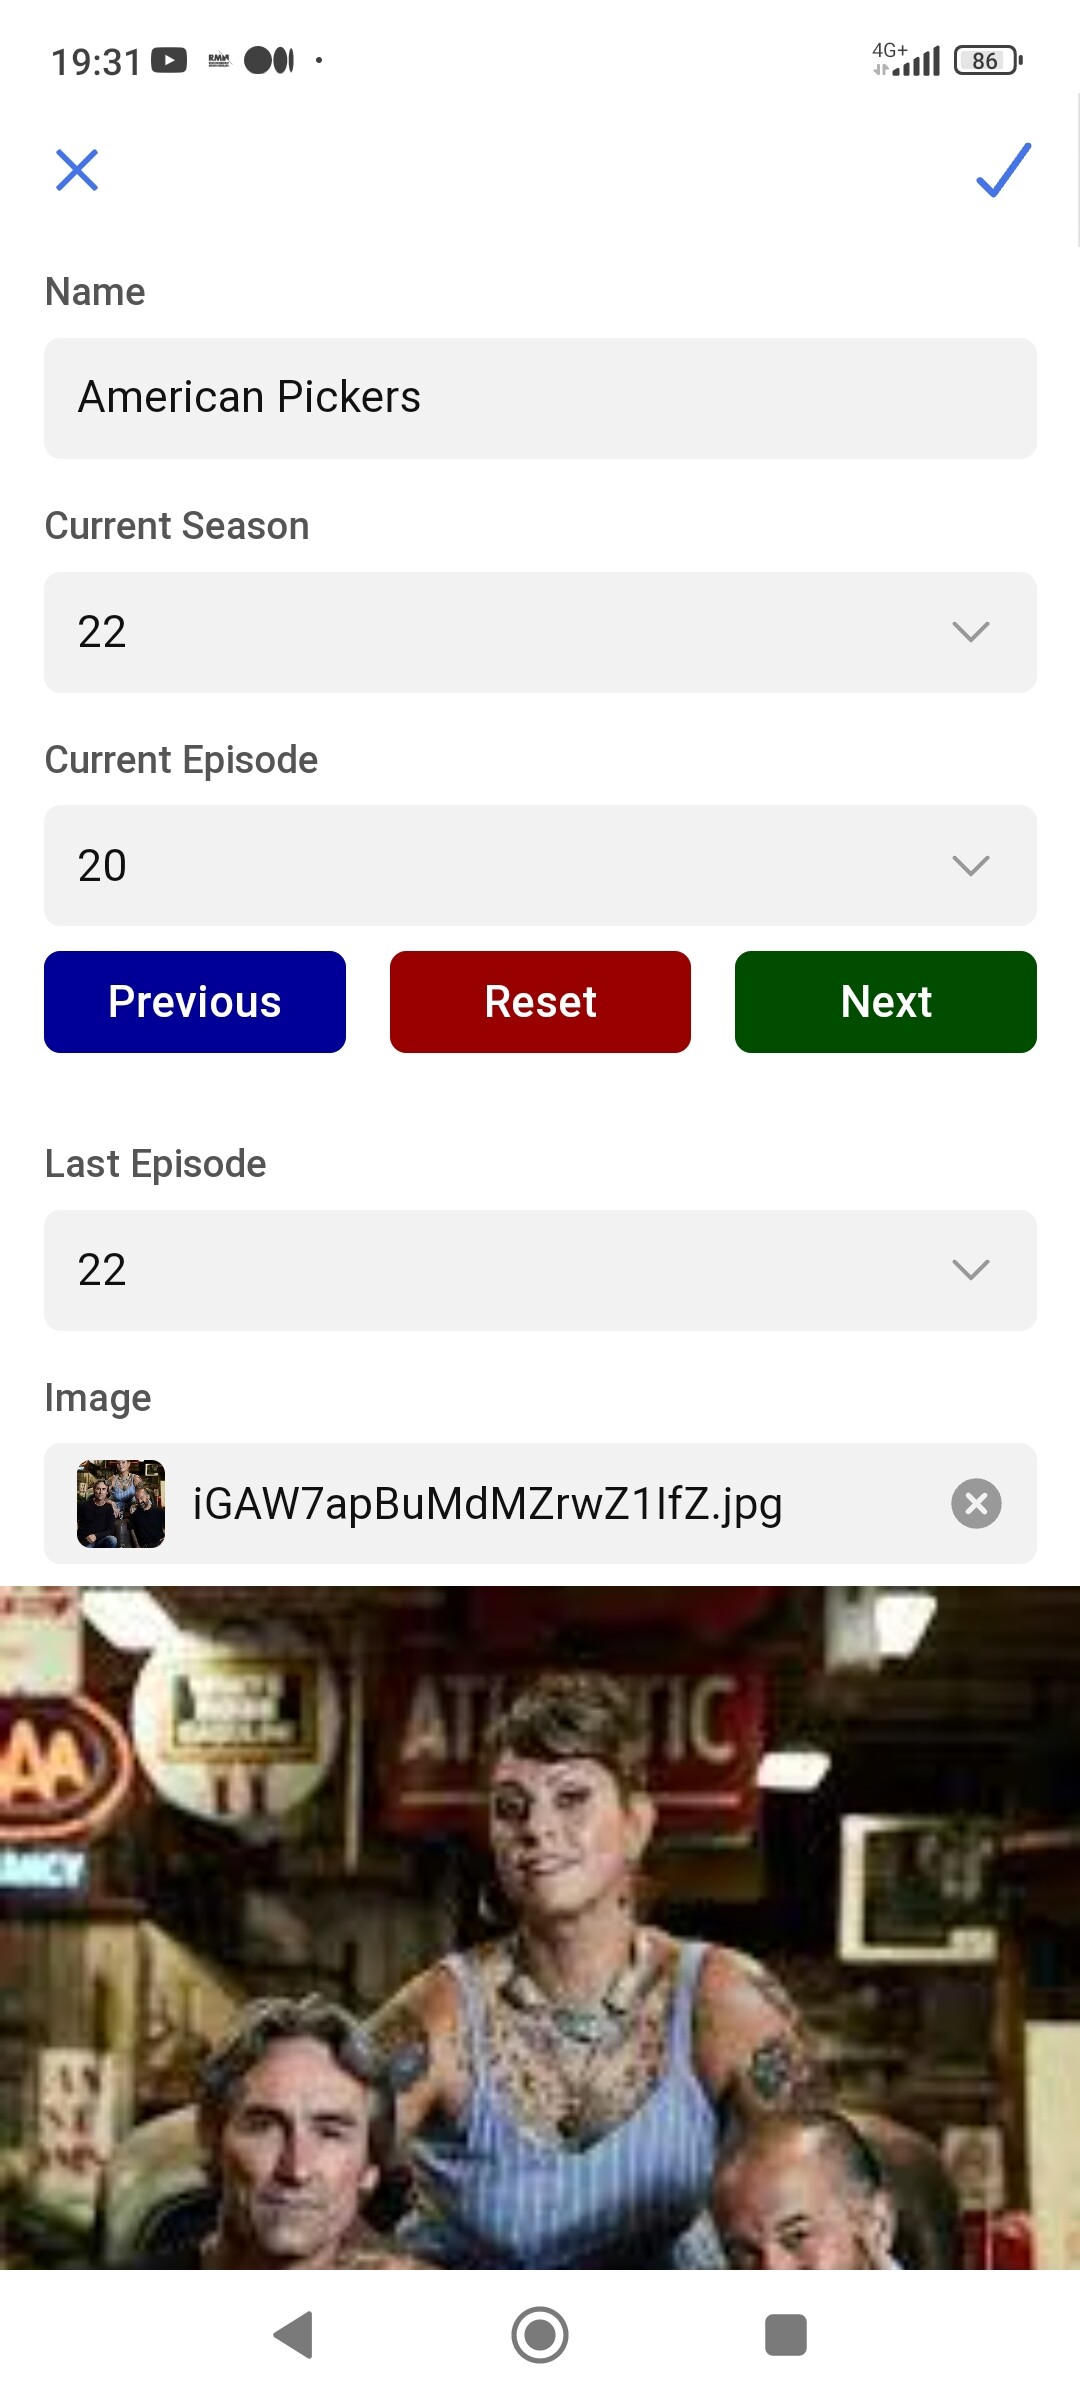
I made some screenshots on my phone.
I hope this is what you asked.

After tapping on one item, you will get the details;
(You can see the three buttons I created, but they are not working (yet))

This will show all the shows/series that I have in the app. So also the shows/series I already had watched all the episodes of.

When you tap on one item, it will show the details.

When you tap the pencil, you can change the details.
When there is a new season, I can set the new season number and reset the episode.
(here you also see the buttons I created, but they are not working (yet))
No problem if it will be the next day. It is slowly getting late here also ![]()
Again many thanks for your time and effort.
Your idea should be possible with a custom action on the Show list that first sets a show row id through a single relation to a user profile row or another table…followed by a second action that shows the details of the show. Then pull that show ID value that was written, into the EpisodeCounter table with a single value column. Then add a single relation in the Episode counter table that links the single value show ID back to the show table. Then the increments can be done through that single relation when you click on each of your buttons.
Hi @Jeff_Hager,
Relations in Glide Apps are not my strongest or most known part. I understand the concept but for some reason, I have problems implementing them.
I think, the more I am reading your idea, slowly I start to see what you are trying to tell.
How I need to implement it, is the next thing ![]()
I think I need to try out some things. Sometimes I need to try things to see and (partly) understand them.
The part I am not sure of is where you mention a single relation to a user profile (or another table)
I am the only person who is using the app. It is something private/personal, so I am not sure if I then still need that single relation to a user profile.
Vaguely I can see what you mean, but how to realize it is my next issue ![]()
The first step is to temporarily write that selected show ID somewhere. It could be any table, but for this case we want to write it to either your user profile row, or the first row of any other table. Writing to the user profile row has some advantages, because column values from a user’s profile record are very easily accessible throughout the app without having to create relations back to that user row. But for this case, I think we’ll do it differently and use a different existing table.
I think you have a Shows Table and a EpisodeCounter table, correct? Let’s assume you want to temporarily write that Show ID to the EpisodeCounter table. First we need to create a link from Shows table, to the first row in the EpisodeCounter table. There’s two ways to do this.
- You could create a static value in both tables. You can do this with a template column and simply fill it something like “X” or “link” or anything you want. It just has to be a matching value in both tables. Once you’ve created those template columns, then create a Single Relation in the Shows table that links the template value to the similar template value in the EpisodeCounter table. Now you have your relation from the Shows table to the first matching row in the EpisodeCounter table.
- A much simpler shortcut is, instead of creating template columns and a relation, simply add Single Value column in the Shows table that refers to the First Whole Row in the EpisodeCounter. By selecting ‘Whole Row’, it acts like a single relation without having to select which column needs to match in both tables.
Next, in your EpisodeCounter table, add a user specific column text column. This will be used to temporarily store the selected show ID.
Now that you have a link from Shows to the first row in EpisodeCounter, then you can start with your custom action on the your shows list.
- First add a Set Column action that will take the selected show ID and write it to the user specific column in the EpisodeCounter table, through the single relation or the single value column you created.
- Then create a second action to Show Detail Screen.
Whenever you select a Show from the list, it should be writing that show ID to the EpisodeCounter table before showing the detail screen for the show.
Now that you have a selected show ID in the EpisodeCounter table, create a Single Value column that will take the show ID in the first row, and populate it across all three rows. Then create a Single relation that uses that column to link the show ID back to the show ID in then Shows table.
Now each of your buttons will have a direct link to the show that was selected.
Finally, you can finish the custom action that you started for your buttons. You should now be able to use a Set Column action to reset the episode count for the selected show through the relation in the EpisodeCounter table. And likewise, you should be able to use an Increment action to add 1 or subtract 1 from the episode count.
@Jeff_Hager, thanks for the very extensive explanation. It is a lot to take in, right now but I will try to go through it one by one.
Right now, I don’t have a user table, because I am the only one using the app. So I will create a new table for this.
I have three tables right now. Shows, Option, and EpisodeCounter.
In Shows, I have all the shows with the season number, current episode number, and the last episode number of that season. (and some other details like the date and time when it was edited and a counter to see how many episodes are still left in this season. I use this for a filter. There is also a template column to display the season and episode number in one text line, plus a column for an image.)
In Options, I have all the numbers from 1 to 40. These numbers I use for the choice component to select the season or episode.
In EpisodeCounter I have the configuration for the three buttons. So the button name, color, and index.
But I think I will rename EpisodeCounter to something else and create a new table named EpisodeCounter to follow your instructions.
I will make a copy of the current app, so if I mess it up, I still have the original one ![]()
Again, many thanks for your time and effort. I will let you know if I have any further questions and how things are going.
Okay, maybe a stupid question, but I am running into a problem already.
To transfer the RowID from my Shows table, do I need to create a ShowID column in my users table, make a relation from my Users ShowID to my users RowID, and create my own action, that will transfer the Shows RowID to the users ShowID column and then show the details?
I hope my question makes sense but I don’t know how else to say it.
First of all, it’s entirely up to you, but for your use case, you probably wouldn’t need a user table. What I described in my previous post could simply utilize the EpisodeCounter table instead of a user table. The only thing with using a user table is that you would have to be signed in to use it as intended, whereas just using the EpisodeCounter table wouldn’t necessarily require you to be signed in. It’s completely up to you. We could make it work either way.
To answer your question, yes, you will need a Show ID column to receive the Row ID from the selected Show. If you decide to use the user table, then that new column does not need to be user specific. If you instead decide to use the EpisodeCounter table then I recommend making it user specific (you are the only user, so it doesn’t NEED to be user specific, but if you ever have multiple people using the same app, then it will be good practice to avoid conflicts)
I think you lost me with the rest of your question. You should have a single relation in the Shows table that links to the user row or EpisodeCounter row.
Before I ramble too much and make it more confusing, which way would you like to go. Do you want to use a user table, or are you OK with only using the EpisodeCounter table like I explained in my other post. We’ll work through bit step by step. I personally think you don’t need the user table in this case, but if you want to learn how to use the user table instead, that’s fine too. I just want to make sure we are on the same page.
@Jeff_Hager, I think I will just use the user table because in the EpisodeCounter I have configurated the three custom buttons. Just to keep things separate.
Here are some screenshots of the different tables.
I think I did it the right way in regards to the relation.


Thanks for doing it step by step.
I think I will use the user table because then I have some idea of what or how to do it in the future.
Ok. So you shouldn’t need a relation in the user table. It won’t be used for anything. Also the fact that you are trying to link the user row id to the show row id will never provide any sort of match. I would delete that relation.
What you need instead is to create a relation in the Shows table. Since we are using the user table we’ll need to do this a certain way. Do the following in the Shows table.
- Create a template column that retrieves the signed in user’s email from their user profile row.
- Next, create a single relation that links that template email to the email in the user profile.


This links every Show row to the signed in user’s own profile row. That way, when you click on a Show, the first action (Set Column) can write the selected Show Row ID to a column in your user profile table. So before setting up the custom action to do that, you will first need to create a basic text column in your User table. It does not need to be user specific because each user will already have their own row.

Get that set up, and then we can move on to setting up the custom action on your Shows inline list.
@Jeff_Hager, Thanks.
I already had some idea that the relation I made was not good.
I have done everything you explained. ![]()
Sorry for taking a while to respond. I started my weekend early and have limited access to my computer.
The next step is to create a custom action on you Shows Inline List. You already know how to create a custom action, but you’ll want to set it up like below. (I just realized that Glide made it easier to write values to the user profile record. The relation template and relation I had you create in the Shows table is now unnecessary, but hopefully it was good practice in creating a relation. You can delete those columns if you want…sorry I missed this detail) First create a Set Column action that will write the Show’s Row ID to the Show ID column in the User table:

Notice that I’m setting the user profile row as the source row, and then filling the Show ID with the Row ID from the selected show from the Show table.
The second action in the custom action will show the Detail screen for the selected show.

Now, in your EpisodeCounter Table, you want to create a template column. This will take the ShowID that was written to you user table and populate it across all rows in the EpisodeCounter table.

Next you’ll need to create a relation in the EpisodeCounter table that will link that template column back to the Shows table. This will provide a direct link to the the Show you selected.

Now you can change your custom actions for you EpisodeCounter inline list (buttons) to update the the values in the Shows table when you select one of the buttons. You will need a Set Column action to set the episode count to zero, and Increment actions add or subtract 1 from the episode count.


Hopefully that’s everything you need to know. Let me know if you have questions.
@Jeff_Hager,
First of all, it is not a problem for the late reply. I am already very happy that you are willing and able to help me in such a detailed way.
I followed all your steps.
At first, it looked like it was working, but later I noticed that it is only partly working.
In the Set Column action, in the second step, you have “Show Detail Screen”
Originally I had “Show Edit Screen” but I liked yours better so I left it like that.
So now, I need to tap the pencil in the top corner to make changes.
Right under what the current episode number is, I have placed my custom buttons.
When I tap on them, I can see the episode number change.
But when I tap on “Done” in the top corner and go back to the details screen, the current episode number is still the old number.
I had checked everything a few times but did not really see what could be wrong or missing.
Maybe you have some idea?


@Jeff_Hager,
Here is a small update.
I already replied to your last post, that I had followed all your steps but I was having some problems.
If I chose the pencil in the top corner to edit the details, then the episode number was not updated.
Now I have changed things a little.
After selecting the show, in your setup, you would go to the details screen.
Now I have placed my custom button bar there. When I tap any custom button, the episode number is changed. Also if I go back and forward. So it is working there.
But if I place my custom button in the “Edit Screen” they are not working.
Well, they are working (sort of). I can see the episode number change, but when I tap on “Done”, the episode number is not changed.
Right now, I have no idea why it is only working in the details screen and not in the edit screen. There should be an explanation for it, but I have no idea.
In the edit screen, if I replace all the text components with text entry components and tap “Done”, then all the data is stored correctly.
(Maybe a bug somewhere?)
Anyway, I got things to work on the details screen and I am happy with it.
I am thinking of redesigning my edit screens and just use Text Entries and remove the choice components. ![]()
There is one more question. Maybe it is a general question.
If I create a custom action, give it a unique name and save it, should this then not show up in the action list?
Because if I save it, I don’t see it in the action list.
Now it means that (in some cases) I need to create the custom action maybe several times.
I want to thank you for all your time and effort to help me with this. It is very much appreciated. ![]()