Hey guys, everthing great?
Hope you’re all developing great apps with glide!
First of all, I’d like to share my quick story with you:
My developer story
I’m a back-end developer and have absolutely no experience with front-end programming.
For those who doesn’t know, the back-end development is the “logical” programming of an application and the front-end development is the “visual” development of an application.
That being said, I had a huge problem with my startup MVP, because it needed to be a complete application, and all I could develop wasn’t ready for customers to use, because it was basically an API. In other words, a bunch of code.
Glide helped me with that!
And now I’m capable of programming my own back-end logic and using glide as a front-end.
I’m writing this post to people that want to be capable of doing more with Glide, and unleash it’s power.
Today, I’ll teach you how to connect Google Sheets to Python to enhance Glide capabilities even more. For the tutorial, I’m going to code a little e-mail sender example that I think would be useful to many Glide users.
But Gabriel, why it would be useful to me to connect these two if Glide is meant to be a low-code solution for building apps? Isn’t this contradictory?
Well, I don’t think so. If you read my story it will become clear to you that Glide has much more to offer than being just a low-code solution. And in some cases, Glide actually helps people to understand logical programming better. If you need more power from Glide and feels restricted by Google Sheets, this is perfect for you!
Use-cases:
There are so many uses for that integration that I could stand here typing all day long, but I’ll show some examples:
- Zapier free alternative, as Python has a lot of packages to almost any appliance.
In my app, I use it to send e-mails and integrate with Twilio, to send WhatsApp messages.
It can even provide free notifications, if used with telegram’s free bot API! - Use another many different sources of data, such as databases, websites, and so on.
- Manage members with subscription, integrating it with payment gateways.
- Deploy scheduled scripts to delete unused rows, register and unregister users, and perform ANY sheet manipulation you need.
Requirements:
- Python Core
- gspread (A Python Package)
- Willpower (I guarantee you that is worth it.)
Let’s go!
1) Install Python Core
Download it in the link above and install it if you don’t have it already.
How to install Python Core
1.1) Click on the yellow download button:

1.2) Go through installation process by clicking “Install Now”, and be sure to check the “Add Python 3.8 to PATH”

2) Install gspread Package
How to install gspread package
After installing Python, open up a Command Prompt by pressing WIN+R and typing “cmd”, then enter.
(If you’re on another platform, open your terminal in your way.)
On the terminal, type “pip install gspread”, and then press enter.

If the system doesn’t recognize your command, it’s probably because Python was not added to Path (System environment variables), so go back to step 1 and install Python correctly.
You’ll see a bunch of commands running until it installs completely.
3) Enable Google Developers API and Create a Service Account
This step is going to grant your Python script access to your sheet.
How to enable Google Developers API and Create a Service Account
3.1) Go to Google Developers Console and log-in with your Google account that contains your Glide sheet.
3.2) Create a project.

Name it whatever you want and click create.

After a little while, your project will be created and will be your active project.
3.3) Then, you have to enable APIs and services.

3.4) You’re going to be redirected to the API Library. There, you need to activate both Google Drive API and Google Sheets API. It’s simple as clicking on them and pressing enable.


3.5) All good! Now we need to have access to that resources. So click on the sandwich menu icon and select APIs & Services > Credentials.

On the credentials page, click on create credentials and then go to service account.

Name it and write a description, then click create.
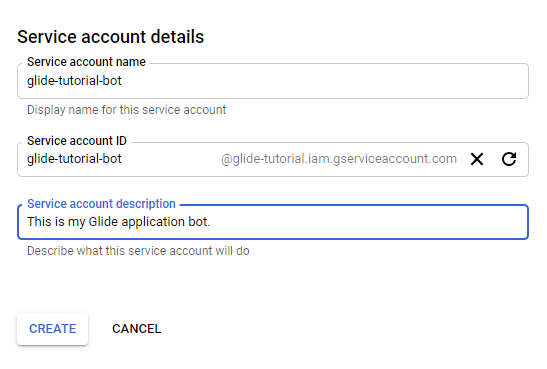
Grant it the Project > Editor role.

On the next page, go directly to create key button.

Select JSON and press create.

A file will be downloaded to your computer. Keep it in a safe place, we’re going to use it soon.
![]()
WARNING: Do NOT share this JSON file with ANYNONE.
This gives full access to your Google Drive. BE CAREFUL.
Press done.

Copy the service account e-mail to your clipboard.

And share your Glide sheet with that e-mail, with editor privileges.
![]()
4) Python Code!
How to do the code in Python
So now you’re going to do some code in Python. If it’s your first time doing that, I strongly recommend you watching some YouTube videos with Python basics. But I guarantee you, it’s simpler than it seems. Python is a high-level, easy comprehension programming language.
You can also take a look at gspread documentation, there you’ll have a lot of examples of how it works with Google Sheets.
For the tutorial, I’m going to code a little e-mail sender example that I think would be useful to many Glide users.
Oh, I almost forgot: It’s highly recommended using an editor such as Visual Studio Code, which is free, by the way.
4.1) Importing necessary packages
So, here, I’m going to import gspread package and some e-mail-sending packages.

4.2) Connecting with your sheet
Here, you need to set the scope, the service account and the sheet variables exactly as this
I recommend placing the .json file you downloaded earlier on the same folder as the script.
You can find your spreadsheet key in the spreadsheet URL, after the “/d/” part:
scope = ['https://spreadsheets.google.com/feeds', 'https://www.googleapis.com/auth/drive']
gc = gspread.service_account(filename='your-key-here.json')
sh_glide = gc.open_by_key('your-spreadsheet-key-here')

Then, you’ll need to select the worksheet that you want to work on, by using
worksheet = sh_glide.worksheet("Worksheet name here")
Note that if you change your worksheet name you must change it here too in order for it to work.
You can select multiple of them, just assign to different variables.

4.3) Iterating through cells
Now, we’re going to create a loop that iterates each row of our spreadsheet to send each user a e-mail.
To keep it simple, I’m going to use this structure:

So basically I’ll call a gspread function that returns me a list of rows.
values_list = worksheet.get_all_records()

If I print values_list, it ouputs this, which is a list of dictionaries. (If you aren’t familiar with that, don’t worry.)
![]()
Now, I’m going to iterate through every element of this list and assign each column to specific variables.

4.4) E-mail sending
To send the e-mails, I recommend you setting the configuration variables before the loop (for row in values_list) part. You’ll need SMTP, login and password for your desired e-mail service.

And then, there’s not much to explain about the code added, it just sends e-mails.

So, if you do everything right, you’ll be sending e-mails for free in just a click.
5) Automation
How to automate the script execution
There are several ways to automate this script. If you host it in a free tier instance of AWS or Google Cloud, you can use Linux crontab. If you’re running windows, you can use scheduled tasks. Because the tutorial is already huge, I won’t get into that. Maybe on a next episode ![]()
Guys, let me know what you think of tutorials like this.
I know it is huge but I wanted to show you some of the infinite possibilities that Glide offers by using Google Sheets as the data source.
Feel free to contact me if you have any doubts or face any problems, I’ll be more than happy to help!
This is my thanks to Glide community, and I expect to be very active here on the forum.
See you soon, guys!


